This guide has been written based on accessing the map using Windows. The experience of those who use other operating software, such as Apple or Android, will differ. Please do tell us if you encounter any particular difficulties in using the map.
1. The map is best viewed on full screen. Click the box that looks like this
It is at the top right-hand corner of the map.

2. To see the range of services available, click the little box (top left hand corner) that looks like this to see the Map Legend.

3. A layer selector should have appeared to the left of the map. Each layer and sub-layer contains a list of locations or resource providers. To select or de-select a layer, simply click on the checkbox alongside to tick or un-tick it.

4. A layer selector should have appeared to the left of the map. Each layer and sub-layer contains a list of locations or resource providers. To select or de-select a layer, simply click on the checkbox alongside to tick or un-tick it.
5. To home in on your own neighbourhood, first view the map on full screen. Then click on the magnifying glass symbol
It can be found at the very top of the map towards the left. Then type in the first part of your postcode e.g. SE13.

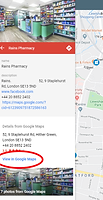
6. Once you have located the service you want, click either the icon on the map, or on its name in the list. You will then be shown information about it.

7. To get directions on how to travel to your selected resource, click on ‘View in Google Maps’.

8. To print or copy the map, find the symbol that looks like this
It is found towards the left of the screen at the very top. (You must be viewing on full screen.)


